What we need is more Chocolate!

    • What we need is more Chocolate!

      I'm going to start a thread. Chocolate everything. Cooks and cakes, allsorts. Starting with
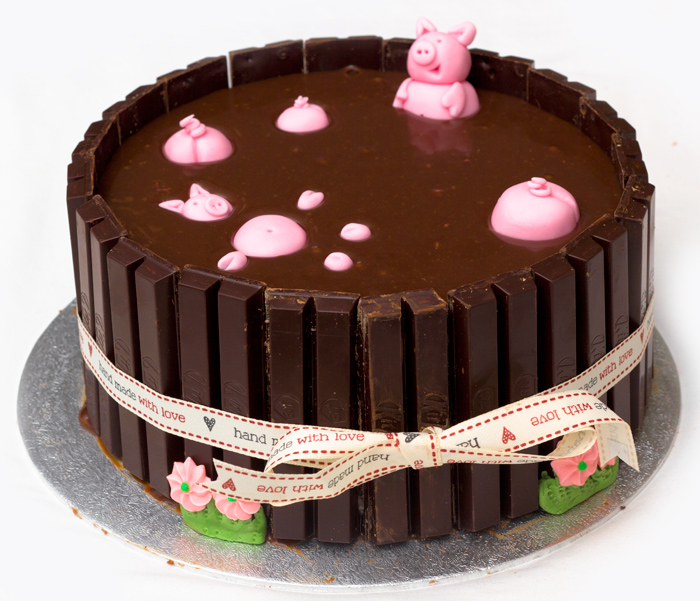
      PIGS IN MUD CAKE

      Recipe adapted from the Hummingbird bakery home sweet home book -
      Ref: Sunday Baking .co.uk

      Mississippi Mud Cake Recipe with kit-kats


      AUTHOR'S NOTES AS FOLLOWS
      This cake does take a little while to put together, but if I’m honest, the worst part of it was waiting for the topping to cool/thicken enough before pouring it over the cake! I get very impatient when I can see it coming together and want to rush ahead and finish it. And to be fair, I still did this so the floating pig did sink a little further into the ‘mud’ that he was meant to due to me being too quick to drop him in!

      Everyone loved this cake, especially my 3 year old nephew! My nan and grandad were equally as impressed – my nan convinced I’d inherited my skills from her and my grandad quizzing me on what a blog is, who looks at a blog, how I can tell if anyone looks at my blog and why I would write a blog…..mother….please show grandad this so he can understand slightly better than the way I described it!


      My biggest tips when making this cake would be…


      Wait for the chocolate/cream mix to cool and thicken before you fill the cake as otherwise it will seep through the kit-kats.
      Wait until the chocolate/cream mix is almost set before dropping the pigs in, otherwise they may sink too low!
      If you’re a beginner, don’t try to make a swirl in the ‘mud’ like in the original photo – it will just look like it’s gone wrong/a mess!

      Ingredients for the cake:
      (This makes 3 cakes – I only used 2 and froze the 3rd)
      • 250g unsalted butter – softened
      • 600g caster sugar
      • 3 large eggs
      • 470g plain flour – sifted
      • 140g cocoa powder
      • 2tsp bicarbonate of soda
      • 1/2 tsp salt
      • 375ml buttermilk
      • 1 tsp vanilla extract
      • 375ml boiling water
      Method:
      • Preheat the oven to Gas Mark 4 / 160°C (fan) / 180°C and line 3 20cm (8in) cake tins
      • In a freestanding electric mixer with the paddle attachment (or using a hand-held electric whisk) cream the butter and sugar together until light and fluffy
      • Add the eggs one at a time, mixing well after each addition
      • In a medium bowl, sift the flour, cocoa powder, bicarbonate of soda and salt together
      • Mix the buttermilk and vanilla extract together in a jug
      • Add 1/3 of the dry ingredients to the creamed butter and sugar – mix well on a medium speed
      • Add 1/3 of the buttermilk mixture – mix well on a medium speed
      • Repeat these steps until it is all combined
      • Slowly add the boiling water, mixing until combined
      • Divide the batter evenly among the prepared cake tins
      • Bake for approximately 35-45mins
      • Remove from the tins and allow to cool completely before frosting
      Ingredients for the frosting inside the cake
      • 150g icing sugar – sifted
      • 50g unsalted butter, softened
      • 20g unsweetened cocoa powder
      • 1 1/2 tbsp whole milk
      Method for making the frosting:
      • Using the electric whisk or mixer with the paddle attachment, slowly beat together the icing sugar, cocoa and butter until the butter is completely mixed in (mixture will still be powdery at this stage)
      • With the machine still running on a slow speed, gradually pour in the milk
      • Once added increase the speed to high and whisk until light and fluffy
      • Spread evenly between the two cakes
      Ingredients for the pigs
      • Ready to roll fondant icing
      • Pink food colouring
      I can’t really tell you how to make the pigs as it’s up to you how you want them to look! I just mixed in some pink food colouring to the icing and kneaded it well to create a smooth colour. Then I copied the look of the pigs from the orginal image.
      Ingredients for the chocolate sauce topping
      • 250ml double cream
      • 400g milk chocolate
      Method for making the chocolate sauce:
      • Put your cream in a pan over low heat
      • Keep stirring until it just starts to boil
      • In between break the chocolate bars into pieces
      • When the cream is almost boiling take it from the heat and gradually add chocolate
      • Keep stirring until you have a nice smooth mass and then leave to cool stirring every now and again
      This is where you need to be patient! Make sure it has cooled and thickened before you take the next steps!
      • Break your kitkats in two (if they are the 4 finger variety!) and have them ready
      • Once your chocolate sauce has cooled at thickened to a custard consistency you can start smearing it on the sides of your cake. Use a spatula or the back if a knife to do this.
      • Once you’ve smeared it all around you can stick your kitkats on. This can be a bit tricky so place them on a slight angle against the cake. When you have gone right around quickly tie your ribbon around the cake. This will pull the kitkats up straight against your cake
      • When the left over chocolate sauce is only just fluid pour it over the top of the cake. MAKE SURE IT IS NOT TOO THIN WHEN YOU DO THIS OR IT WILL SEEP BETWEEN THE KITKATS.
      • Before it totally sets place your little piggies on the chocolate
      • Place in the fridge to set
      And that’s that – a great looking cake that tastes good too. We all ate it for pudding and had it with warmed custard. It doesn’t need it, but it was a great addition!


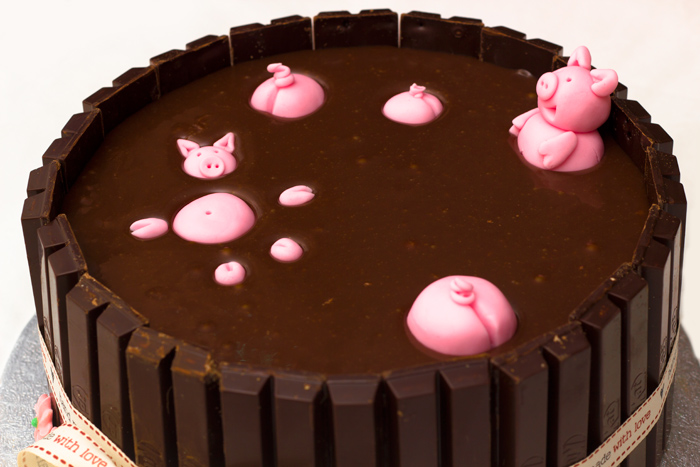
      Just look at that pig's botty! LAWL :D

      Footnote. My wife made the cake, using KitKats. She made it over a couple of days. It IS very sweet, so I could only have a little. But I made sure I had a little bit of piggy. ;)


      Sometimes the best memories people make, are new ones.
    • REAL Chocolate Spread.

      I don't like hazlenuts in chocolate spread or, that oil the manufacturers bung in. So, I went to find a recipe that was just pure magic and found it here called Sugar Heroes

      This is the recipe I took from it. Its so easy to make, too. Just buy the nicest chocolate you can find. Like Lindt or Valrhona. This is the highest awarded recipe: 15 Pigs. Right, let's get cracking!


      This rich, smooth chocolate spread is perfect on toast, croissants, or fruit, or use it as a topping for cakes or cupcakes.
      Ingredients (1.5 cups)
      • 1/4 cup water
      • 1/2 cup granulated sugar
      • 1 tablespoon unsweetened cocoa powder
      • pinch salt
      • 1 teaspoon real Bourbon vanilla extract
      • 4 ounces bittersweet chocolate, finely chopped (about 2/3 cup)
      • 5 ounces unsalted butter, softened and cubed
      Instructions
      • In a small saucepan, combine the water, granulated sugar, unsweetened cocoa powder, and salt. Place the pan over medium heat and stir until the sugar and cocoa powder dissolve. Continue to heat the pan, stirring frequently, just until it reaches a simmer.
      • Once simmering, remove the pan from the heat and add the vanilla extract, chopped chocolate, and cubed butter. Whisk until the chocolate and butter melt and the mixture is completely smooth. When it is freshly made, this spread will have the consistency of hot fudge sauce.
      • Pour the spread into a jar or other container with a lid. Press a layer of plastic wrap on top of the chocolate to prevent a skin from forming, and refrigerate it until it thickens. If it is too cold to spread easily, let it sit at room temperature for a short while before serving. Store it in the refrigerator for up to two weeks. I doubt it will last that long though. Caught my daughter eating straight out of the jar, haha.


      Sometimes the best memories people make, are new ones.
    • Delicious Chocolate Cherry Trifle.


      This is an absolute win if you can find those lovely plump sweet Morello cherries and partner them with a bar of high quality dark chocolate, like Lindt or Green&Black's.


      My tips:
      With the chocolate, use no less than 50% cocoa solids, but no more than 60%, or the chocolate taste becomes far too overpowering. Also use only authentic vanilla essence, like real Bourban vanilla. If you dislike Kirsch, then Kahlua makes an excellent substitute and it's cheaper. I don't see why the alcohol can't be added to the chocolate mix instead of the cream as it mixes just as well. Be careful not to over-whip the cream or it will go buttery. If you dislike whipped cream, I don't see you can't pour the flipping lot over the top and be done with it. And buy a bigger tub of cream while you're shopping. A little extra double cream added to a nice breakfast coffee or hot chocolate make a big difference. So how many does this trifle serve? Honestly, I don't know. It's just so delicious that your guests will be wanting more.

      • 100g bar good quality dark chocolate
      • 400ml full cream milk
      • 3 medium egg yolks
      • 2tbsp caster sugar
      • 4 level tsp cornflour
      • Dash of vanilla extract
      • 150g marble cake or chocolate muffins or cake of your choice
      • 4-6 tbsp kirsch or cherry brandy
      • 8 tbsp cherry compote or red fruits compote
      • 284ml pot double cream
      • A few fresh cherries
      1. Hold the bar of chocolate at an angle on a board and scrape down it with a sharp knife to make lots of shards of grated chocolate for decorating the trifle. Use at least a third of the bar. Set these aside in a cool place.

      2. Pour the milk into a pan, add the rest of the chocolate and heat gently until the chocolate has melted and the milk has almost boiled. Stir it occasionally. Meanwhile whisk the egg yolks, sugar, cornflour and vanilla extract in a large bowl.

      3. Pour the warm chocolate flavoured milk into the egg mixture, stir well and pour it back into the pan. Cook over a low heat, stirring to make a smooth, thick custard. Pour the custard into a clean bowl, cover closely with cling film and leave to cool.

      4. To assemble the trifle, slice or break up the cake into chunks straight into a trifle bowl. Sprinkle the kirsch or brandy over then spoon in the compote. Spread the custard on top.

      5. Whip the cream (add a little sugar and more booze if you like) until it just holds its shape. Place spoonfuls of cream on top of the custard. Decorate with lashings of grated chocolate and the fresh cherries, just before serving.

      Recipe from Channel 4.com


      Sometimes the best memories people make, are new ones.
    • Make Chocolate Cake in 5 minutes using just one bowl.

      A great choc cake recipe from Life Hacker


      The folks over at Serious Eats devised a delicious microwave cake you can make in a single bowl so you don't dirty too many dishes. Then you just microwave that bowl for five minutes and you have a fudge-filled chocolate cake. The ingredients go something like this:


      • 3/4 cup (3 3/4 ounces) all-purpose flour
      • 3/4 cup (5 1/4 ounces) granulated sugar, divided
      • 3/4 cup (2 1/4 ounces) cocoa, divided
      • 2 1/4 teaspoons baking powder
      • 1/4 plus 1/8 teaspoon salt
      • 2 large egg yolks
      • 6 tablespoons (3 ounces) unsalted butter, melted
      • 2 teaspoons vanilla extract
      • 1/2 cup semisweet or bittersweet chocolate chips
      • 1 cup warm water
      Take a 1 and-a-half quart shallow microwave safe dish, mix the dry ingredients, then add the wet ones, mix it all up, and then microwave for five minutes. When the time is up, you've got cake!


      Take care as cake will be hot. This cake is best served warm.

      Note about Life Hacker. The website may contain graphic material, so be careful.


      Sometimes the best memories people make, are new ones.


    • Dark Chocolate Cheesecake with Cinder Toffee Dust

      Serves 10


      Ingredients:


      190g digestive biscuits
      75g butter
      300g cream cheese
      90g caster sugar
      2 medium eggs
      2 medium egg yolks
      105ml sour cream
      half – 1 teaspoon lime juice (to taste)
      100g dark chocolate, melted
      80g powdered cinder toffee, plus extra for decoration


      Method:


      1. Preheat oven to 180C and boil some water. Line a 20cm springform tin with greaseproof paper and wrap its outer edges tightly in foil. Melt the butter in a thick based pan, crush biscuits and mix with melted butter. Press the mixture into the tin. Add a layer of powdered cinder toffee, leave an inch between the edge of the tin and the toffee.


      2. Beat the cream cheese in a fairly large bowl, then mix in the sugar thoroughly. Beat in the egg yolks one by one, followed by the sour cream and lime juice. Melt the chocolate in a bowl suspended over simmering water.

      3. Gently fold the chocolate into the cream cheese mixture. Don’t mix too thoroughly; you want a marbled effect, not a uniform one.

      4. Pour the mixture on top of the “buttery biscuit base” and place in a deep oven dish. Pour the boiling water into the oven dish until it comes roughly 3cm up the tin. Cook for an hour.


      5. Remove cheesecake when wobbly and set. Leave to cool and then cover the top in a layer of powdered cinder toffee. Remove from the tin at room temperature.


      Recipe reference: FrugalFeeding


      Sometimes the best memories people make, are new ones.
    • AccessDenied wrote:

      martinBoy98 wrote:

      Looks nice . But , eat this and get diabetes should be is short description of all these cakes . :D
      Don't be an ass. Only if you eat sugary food, all of the time (or sugar-packed sodas such as Pepsi or Coke), then very possibly. But these chocolate recipes are for treats.
      Treating with chocolate cakes . From tomorrow I'm starting treating with vodka ...
    • Double Chocolate Cookie Bites


      By far the best feature of these double chocolate cookie bites is the contrast between the light, creamy white chocolate and the dark, bitter cocoa. Indeed, ingredients which contrast, but don’t clash, often make some of the best culinary combinations. In this case, the two very different characteristics of each chocolate serve almost as a remedy for one another; no bite is too bitter, nor too sickly. These cookies work – to borrow the phrase of a small, greedy, fair-haired, fictional girl – ‘just right’. Though, let’s face it, the collective understanding of ‘The Story of the Three Bears’. More commonly referred to as ‘Goldilocks’, has about as much definite meaning as does the term ‘cookie’. How many of you knew that in the original version the character later dubbed ‘Goldilocks’ was actually a thieving old hag? xD


      Makes 12-14


      Ingredients:
      • 225g plain flour
      • 1 tsp baking powder
      • A pinch of salt
      • 2 tbsp cocoa powder
      • 100g butter
      • 80g granulated sugar
      • 70g dark brown sugar
      • 2 eggs
      • 100g white chocolate, chunked
      • A splash of milk if necessary

      1. Let’s make this nice and simple, for if my 13 yo daughter can make these so easily, then so can you. Cream together the butter and sugars. Beat in the eggs, one at a time. Mix together the flour, baking powder, salt and cocoa powder. Tip the dry, along with the chocolate chips, into the wet and mix thoroughly. The mixture may need a small splash of milk to loosen it a little – flour tends to act differently from batch to batch. Leave the dough to rest in the fridge for an hour.


      Sometimes the best memories people make, are new ones.
    • Florentines


      As their name suggests, Florentines are an Italian “biscuit” that originally hail from Florence, Tuscany. In their most basic form they are essentially a group of nut and cherries set in caramel and coated on one side with dark chocolate. However, as with most concepts, there are a million-and-one variations on the classic.


      Makes 8-12


      Ingredients:
      • 60g blanched almonds, roughly chopped
      • 25g mixed peel
      • 25g raisins
      • 25g sultanas
      • 25g dried cranberries
      • 25g glace cherries
      • 35g plain flour
      • 75g butter
      • 75g golden syrup
      • 100g dark chocolate


      1. Preheat the oven to 180C and line a tray with baking parchment. Melt together the butter and golden syrup. Remove from the heat, stir in the fruit and sift in the flour. Stir thoroughly.


      2. Spoon the mixture onto the sheet in 1 tbsp dollops, flatten a little bit around 1 inch apart. Pop in the oven for 8-10 minutes, until golden brown.

      3. Allow to cool on parchment for 5-10 minutes until rigid, then remove to cool completely on a wire rack. Melt the chocolate in a bowl suspended over simmering water, coat the bottom of each Florentine. Leave to set chocolate side up before indulging.


      :P


      Sometimes the best memories people make, are new ones.
    • Simple Chocolate Cookies
      Recipe by Nigel Slater of The Guardian UK


      The most straightforward chocolate cookies for those who don’t like their biscuits too sweet. Don’t be tempted to skip the refrigerating time. Makes 12 cookies


      Nigel
      Time for a sweet treat. Bitter chocolate, glistening preserved ginger, glowing candied peel and shimmering fruit preserves can all come out to play at this time of year. This is the moment when I switch the oven on, tune in the radio to a favourite station and spend the occasional afternoon baking. ’Tis time for little cakes, crumbly chocolate cookies, dark and sticky brownies with a coating of crisp chocolate and flaking pastries packed with nuts and sweet fruits. Merry Christmas!

      Ingredients:
      butter 70g
      light muscovado sugar 70g
      dark chocolate 125g
      egg 1
      vanilla extract 1 tsp
      self-raising flour 100g
      cocoa powder 50g
      icing sugar to finish

      Using an electric mixer fitted with a flat paddle beater, cream the butter and muscovado sugar together until it’s light and creamy. Melt the chocolate in a small bowl over barely simmering water. Beat the egg and add it to the butter and sugar then stir in the melted chocolate and the vanilla extract.

      Sift together the flour and cocoa powder, then fold into the mixture together with a pinch of salt. Refrigerate the mixture for 2 hours. (Don’t miss this step, otherwise your biscuits will lose their shape when they are cooking.)

      Set the oven at 180C/gas mark 4. Shape the biscuit mixture into 12 balls then place them on a parchment-lined baking sheet and bake for 12 minutes till risen. They will be quite soft.

      Let the biscuits firm up for a minute or two then gently remove to a cooling rack using a palette knife. Dust with icing sugar before eating.


      Sometimes the best memories people make, are new ones.